Showing posts with label dynabolt. Show all posts

Sunday, 26 February 2012

Laying the strawbales


Water is cancer for strawbales.  In order to protect the straw from moisture, it is laid atop wooden boxing that is filled with gravel.  This ensures that, should moisture get into the walls, it can drain down through the straw and rest in the gravel away from the straw before draining outside.  Ideally, water would not get into the walls and that's our aim but, in the unlikely event of a washing machine or dishwasher-based emergency, it's important to be prepared.

Strawbale walls are strapped to the floor and to the top beam as tie-down.  This can be achieved a number of ways.  Many people are making strawbale walls with nylon strapping that can be ratcheted down.  We could not afford this option.  So we used fencing wire instead.  We made strips of wire with loops on both ends that were secured under the bottom boxing.

The bottom boxing was secured to the slab with dynabolts.  The boxing was secured to the posts with skew nails. 


The boxing was then filled with gravel and levelled:
Funky corner piece near the front door

The strawbales were then laid in a brickwork pattern where one bale overlaps two halves below.  As the strawbales are not perfect rectangles, the gentleman builder made a bale hammer.  We affectionately called it Stress Relief.

We have had a suggestion from a friend that stress relief should be hung ceremoniously above the front door!

Once the strawbales were laid, the top boxing was put in place so the strawbales could be compressed down.  A fencing wire strainer was then used to tighten the wire over a three day period.


We were battling a very wet year and built the wall in sections.  In each section, the bales were laid, straightened and then rendered on the outside.  We then hung a tarp up to offer further protection to the wall from rain.

North east corner baled


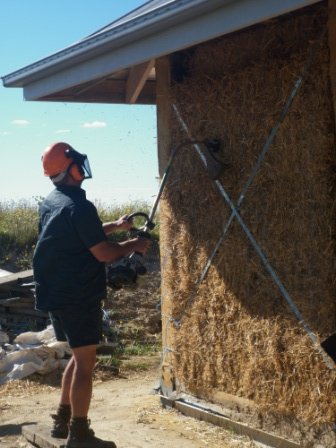
Low tech solution to loose ends of straw - whipper snipper to the rescue


In the sections where a straw bale did not fit, we either made small bales using a tool the gentleman builder forged.  It's essentially a large needle that you poke into the bale a the required length and feed baling twine into it and tie the twine off.  Alternatively, loose straw was packed into spaces that a bale would not fit.  Where loose straw was used, we stapled chicken mesh up to hold the straw in place.


Initially we made cob (straw, clay and water) to fill any gaps before rendering with the lime render (sand, lime putty and water).  The cob was pretty easy to make and apply but the clay content meant it swelled and shrank a lot and made the overlying render crack terribly.

Little Miss loved making cob

And the fact that we encouraged her to get her feet dirty
Cob filling a hole where two bales meet


Prior to rendering, all non-straw surfaces (wood and metal) were painted with a mixture of watered down PVA and sand.  This helps the render to stick to the surface.  Furthermore, the straw needs to be damp before applying render to ensure the render sticks.  Initially we used a pump action spray bottle to wet the straw.  We then purchased a whiz-bang pump action sprayer.  On the second coat of render outside, we resorted to a 10 litre plastic watering can.  The reasons for this are two-fold.  Firstly, the hand and pump action sprayers broke and cost a fortune.  Secondly, the watering can will apply a larger volume of water in about a tenth of the time.  We're still unsure what we are going to use when it comes to applying the third coat inside as, clearly, a watering can will make too much of  a mess indoors.
 
Lime is hard on skin and ridiculously painful if it gets into eyes so we wore protective gear when working with it.  Gloves and eye protection are a must. 

We apply the render with standard tools - rectangular and triangular trowels.

Spraying the wall prior to the application of render


North east corner rendered

Our rendering technique has vastly improved over the life of the build.  We ended up coming back to the first section of wall for a second attempt at a first coat.  As you can see on the right hand side of the photo below, our first attempt was pretty rough.


The gentleman builder initially made the render by hand in the wheelbarrow but it was seriously back breaking work and ended up purchasing a second-hand cement mixer.  It's some of the best money we spent on the build.


Padawan and Little Miss, despite all our best efforts at discouragement, would play on the sand pile.  In one of the first few loads of render, we had a fatality:

One of Little Miss' toy bugs was rendered into the wall and had to be pulled out.  It was subsequently washed and suffered no long lasting ill effects.

Friday, 17 February 2012

Obstacles abound

Once the posts had been freed of their nails and bolts, we again loaded them onto the trailer in pairs and transported them to the block whenever we went there.  In the time it had taken to cut the beams, the slab had cured.  We had Jimmy Brennan (our local engineer) make us some 10mm steel brackets.  The were perfect.

After much investigation we bought about a billion 150mm dynabolts to attach the brackets to the slab and a ludicrously expensive concrete drill bit.

The concrete had cured beautifully and it proved quite a challenge to drill into it.

Drilling the first hole
Our cordless drill did not cut the mustard.  Although it did generate some cement dust, the resultant hole was about 5mm deep before the battery ran out of charge.  So, not to do things by half, we went out and purchased a more powerful, mains powered drill.  Oh, and a $5000 Lister Petter generator to be able to run it.    To store the generator, we then bought a used shipping container to protect it from the rain.


 The kids thought the shipping container was awesome and danced for ages when it was delivered.

Considering we had a shipping container and I found a bargain timber kitchen on eBay, we went to Melbourne to collect it.  Our luck being what it is, on the return journey I blew out the tyre on the trailer and we spent a very long 3 hours between Leongatha and Foster with the kids waiting for the tow truck with the two dogs in the boot.  In the rain.  Thankfully we happened to stop at the entrance to the Great Southern Rail Trail so we went for multiple short walks along the track, returning to the car frequently to check whether RACV were there yet or not.

The tow company eventually arrived and took our trailer to Foster for a new tyre


With great enthusiasm, we took the opportunity to order the timber for the roof frame too:


Little Miss and Padawan loading the pine floor boards into the shipping container
The almost empty (and very clean) shipping container
With all our new kit, we embarked on drilling holes again and managed to get one in.  The problem was, the dynabolt ended up a mashed up mess when we tried to hammer it into the hole and took my poor, patient husband about 5 hours to remove from the hole.  Being a dynabolt, it was not willing to leave it's home.

Rinse and repeat this process a couple of times over and even my hubby's patience was worn through.  Thankfully, my generous and resourceful Dad purchased a cheap SDS hammer drill for us and with many hours spent on Google, we concocted a puffer out of a straw attached to a hand pump from the swiss ball to clear the cement dust debris from the holes.  With the hammer function (and another ludicrously expensive SDS masonry drill bit) we at least quadrupled our productivity.

The posts are used, as you would imagine, to separate the roof from the floor.  The posts and the beams are the major structural component of the walls.  As such, the beams sit on top of and are attached to the posts.  As there are 14 posts (and one internal structural wall) holding up 21 beams, there were many interesting moments as I tried to work out how to chisel out the tops of the posts in the correct order so all the beams would attach correctly.

Preparing the first post (Padawan mastering the hammer)

Unfortunately, I am not blessed with great spatial skills.  My ability to take an object and transfer it into another orientation is, I have to be honest, abysmal.  Much to my poor husband's frustration, I was constantly checking with him to make sure I was going to be removing the correct portions of timber from the top of the beams.  


I've mentioned before that the posts and beams were heavy, we estimated that the posts weigh in at more than 100kg and the beams at about 60kg.  So to lift them to a height of 2.7m was going to take more than me standing on the slab with my hands in the air while my hubby secured them to their various attachment points.

Looking for a low cost solution served to while away more hours on Google.  Being a researcher at heart, my hubby found an old stonemason design for a crane.  In essence it is three (strong) sticks attached together at the top and tied together at the bottom.  In reality it's about 4 weeks of work (including some time at the forge to get the top piece that attaches the three sticks together and holds the endless winch).  The kids were keen for a challenge to find three straight saplings of even size at 4.5m.  My hubby's a pretty resourceful type and the crane has served us well!

The legs were braced with steel pickets
The first post goes up
You can see in the photo above that there is a strip of waterproof membrane under the bracket.  This will form part of the bottom boxing for the strawbale walls.

The brackets were in place for the first post.  For subsequent posts, though, we had one bracket in place before lifting the post then put the second bracket in to ensure a tight fit.  We found with the first post that we had to chock the post in order for it to fit neatly between the two brackets that had been attached to the slab.


Jimmy Brennan's great work
Chain attachment


We used a chain around the post, attached with a U-bolt, and connected the endless winch to that.  The only problem with this configuration was that the posts would go up with a lean.  It became my job to 'man' the winch while my hubby would guide the post into place.  Guiding the post makes it sound like the post just wanted to naturally go where it was meant to.  Wrestle with all the force you have in your body is probably a more accurate description of what actually happened.

The endless winch was just within my reach and my shoulders would burn in the iterative way we put the posts into place.  After the second post, I took our step ladder from home to the block and stood on it to work the winch.  It was a lot faster and reduced the amount of massage my hubby needed to deliver when we got home.