Showing posts with label strawbales. Show all posts

Monday, 9 April 2012

The joys of a custom build

There are many people that visit us at the block and they are almost always surprised at the quality of the workmanship.  The gentleman builder and I are amateurs when it comes to building.  I was lucky enough to have a very talented father who endured my 'help' on many home DIY projects over the years.  Being a very patient man, the gentleman builder, like my father before him, endures my 'help' on building the shouse too.
The gentleman builder spends many frustrated hours fixing the 'work' I have done with the best of intentions but that does not come up to his exacting standards.  While I have the enthusiasm, I lack in technique.  I love building and find it very rewarding but I am, alas, not as skilled as my husband or my father.  I have a mean hammer arm and I can render with the best of them but there are many things that I am not so skilled at (skew-nailing and accurate saw work are the first two things come to mind).
Nevertheless, my husband has persevered (perhaps as I work to fund the project; or is that too cynical?) and he has created an incredible purpose-built space that is morphing into a home on an almost daily basis now.
While over Christmas we were dreaming of moving in over Easter, that has not eventuated and there is still a long list of things to do before we can get the building inspector in to sign off on "our" build.
One of the joys of building something yourself, that you have designed and laboured over, is that it becomes an extension of your belief system and values.  As a family, we firmly believe in sustainability.  We love our children and spend a great deal of time with them.  We take pride in the work that we do and make conscious decisions when it comes to things we consider important. 
I love to watch padawan and little miss explore our block and take great pride in the things that they do.  Recently, we rendered the second coat on the south wall and, as a result the tarps on that side of the house came down.  This revealed the view to Corner Inlet from the south-facing window.  The children loved it and asked me to move the table and chairs so they could make use of the wide sills and take in the views.


Also, insects love to be on our house.  We regularly find stick insects on the north wall, sunning themselves and generally being happy.  Last week, I found a grasshopper inside.  Taking time out from the heat, no doubt as it was a particularly warm autumn day.
 To me, this indicates that the house is truly non-toxic.  Insects would not ordinarily choose to make home in something that would cause them damage.  I like that we will be living in a home that is safe.  That will not be off-gassing noxious crap to infect our lungs and cause us distress.  I hope that I will have fewer migraines when we are living in the shouse as I am sure that the fumes from the paint that we used in the house that we are in currently contribute to that particular ailment.

We have one structural and one non-structural wall in the shouse as well as the roof downstairs and in the attic that will be painted.  We have been experimenting with natural casein paints as we cannot afford to buy low VOC paints that are commercially available.

We trialled a number of options, from left to right:
  1. Straight lime putty which has been rejected because it imparts a powdery residue when you rub it
  2. Lime putty with PVA which performed really well but has been rejected because of the smell
  3. Lime putty with PVA and pigment (which we made from crushing some rocks from the driveway) - also rejected due to the smell
  4. Casein paint - recipe needs refining as the batch we made on the test strip below was too watery
  5. Casein paint with pigment - again, the recipe we used for the test strip was too runny
I like the colour of the lime putty and PVA mix but the smell is too offensive in our very inert home.  We're in the process now of trying to perfect a casein paint.

Interior fit

With the plumbing and electrical phase one complete, the gentleman builder sanded and stained the beams with a mix of linseed and tung oil.  The transformation was a bit Cinderella and we are very happy with the result.


The shower base was installed with cement sheeting and silicone at the joins.

We spent a great deal of time researching insulation.  Ideally we would have loved to have purchased a pure wool insulation.  In the UK you can purchase pure wool insulation, in New Zealand 100% wool that is treated with borax.  In Australia, you cannot get such great products (note to Australian wool growers - there is a potential market here).  So, we settled for Earthwool.  It is made from recycled glass (read, beer bottles) and is lower VOC than any of the other products we looked at.  You still need the full garb of safety gear to cut and install it but it's much less itchy than standard pink batts.


We purchased a second-hand plasterboard lifter and what seemed like an awful lot of pasterboard.


We started with the internal wall. Covering it with plain plasterboard made such a huge difference to the space.

Serious measurements were required to get a close fit around the irregularly shaped beams.
 The result was pretty good!
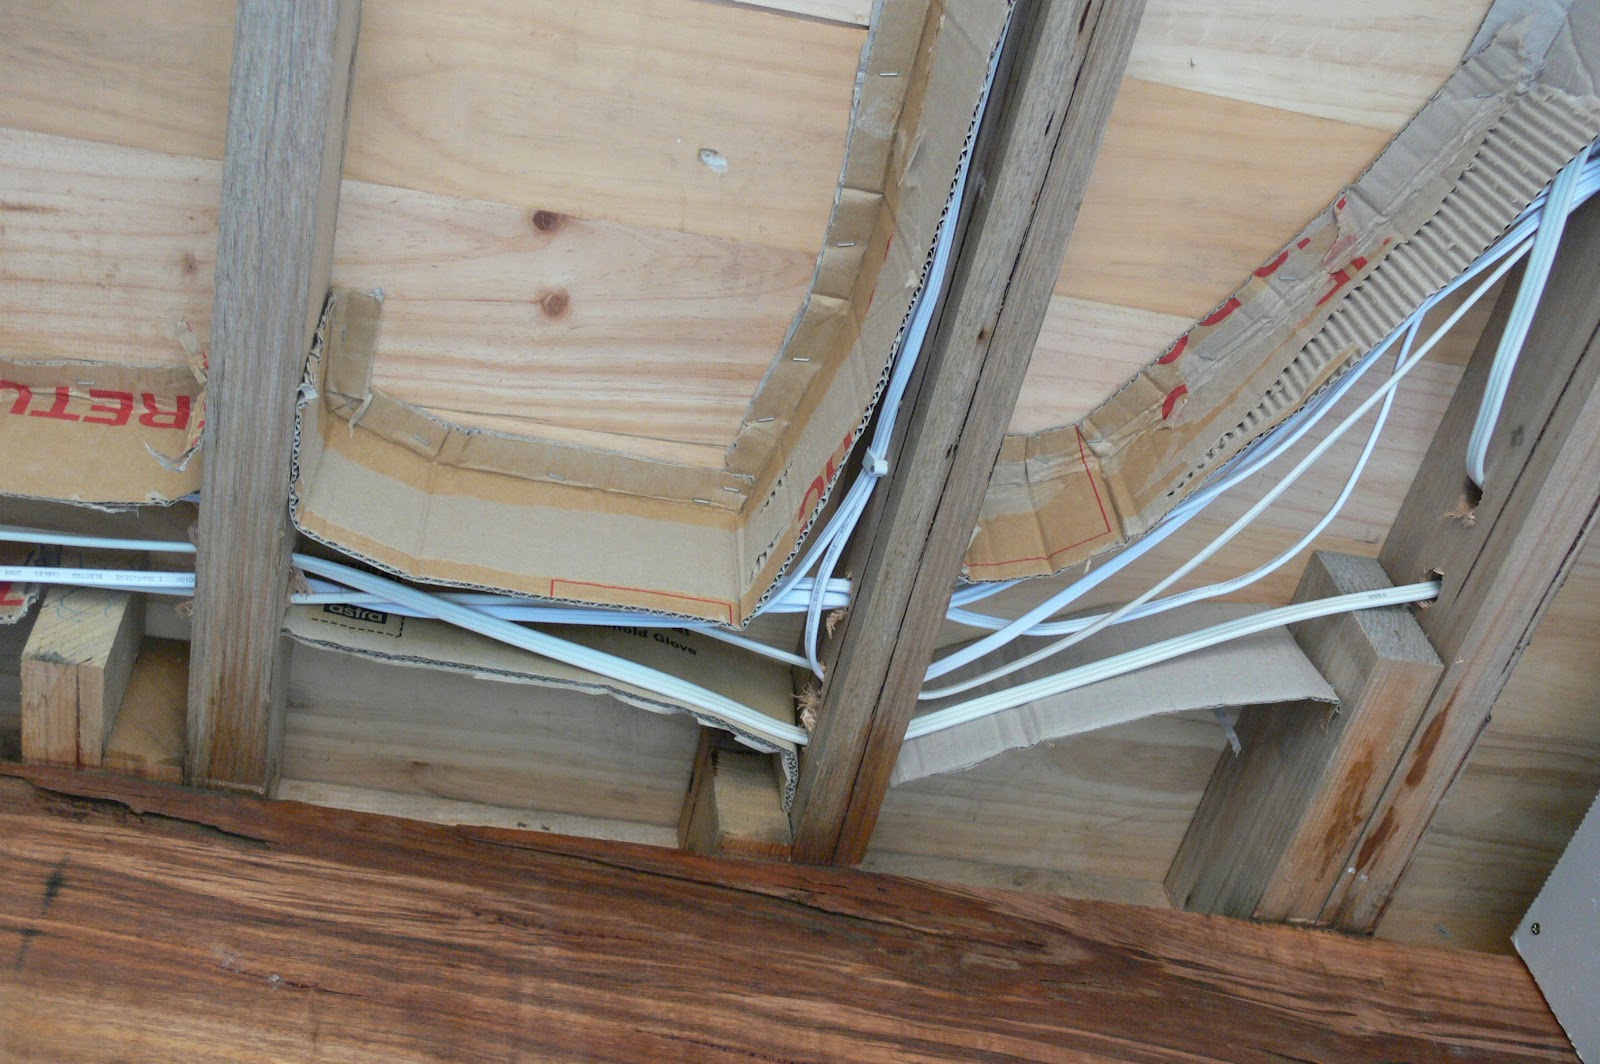
After the insulation dramas the resulted from the Victorian government rebates in 2007, changes were made to the building code which now requires a 5mm air gap between insulation and electrical cables.  To achieve this you can purchase "standard" cardboard separators.  These are available in standard nominal widths to suit common building timbers.  We went for a cheaper option and recycled the cardboard boxes we get when we purchase fruit and vegetables from our local green grocer.

 Again the trusty staple gun earned its place among our most treasured tools.
The Earthwool insulation was cut to length and installed.  Initially we used string to hold it in place but we quickly learned that friction was enough to stop it from falling it we went straight to putting up the plasterboard.


Our joists were not standard spacing throughout the shouse because rather than employ the standard building practice which is to space the joists at 450mm centres and then the last two joists at whatever the leftover is.  Mathematician that the gentleman builder is, worked out how many joists we would need based on 450 centres then divided the space by the number of joists and spaced them evenly.  Thereby, we marked the location of the joists on the beam and the external walls so we could align the screws with the centre of the joists along the plasterboard.  
The external walls, being rendered by hand over strawbales, are far from square.  As a result, we utilised a technique which employs a pencil embedded in a block of wood to mark the wobbly edge of the plasterboard to match the profile of the wall.  A plasterboard saw made pretty easy work of cutting the irregular edge.


Now it is back to rendering the third coat inside before the electrician and plumber come back to install fittings and fixtures.


Tuesday, 28 February 2012

Life is all about compromises

Unless you are a millionaire, and possibly even then, life is about compromises.  I had always wanted bay windows.  One of Mum and Dad's friends had glorious bay windows in their home which we used to hide in as kids and read in as teenagers.  I loved the feeling of being soaked in sunlight but being out of the wind and away from the flies.  Unfortunately, bay windows (as in the glassy component) are ludicrously expensive and well out of our league.  Thankfully, the strawbale walls are 500mm thick once they are rendered and provide an excellent opportunity for wide sills.

As we had milled our own timber for the beams, we had some offcuts and rejected pieces that we had deemed unsuitable for beams but would do just fine as sills.  The gentleman builder set about installing sills and reinforcing them to ensure they will hold enough weight to be used as window seats.  This meant that, again, we had to manoeuvre a very heavy piece of wood into an awkward spot.  The gentleman builder set up a couple of levers to lift the wood to the right height and I, as lacky, provided ballast on the ends of the levers while the gentleman builder put the central supporting pole under the window sill.

Brackets were used to attach the sill to the wooden posts at each end.  Strawbales were then trimmed to fit under the sill.

Once baled and rendered, the sills look pretty awesome.  The one in the bedroom faces north and is gloriously warm on a cold, stormy day.  I foresee that I will spend many spare hours reading in that spot!

Dining sill - facing east for beautiful morning sun

Sunday, 26 February 2012

Laying the strawbales


Water is cancer for strawbales.  In order to protect the straw from moisture, it is laid atop wooden boxing that is filled with gravel.  This ensures that, should moisture get into the walls, it can drain down through the straw and rest in the gravel away from the straw before draining outside.  Ideally, water would not get into the walls and that's our aim but, in the unlikely event of a washing machine or dishwasher-based emergency, it's important to be prepared.

Strawbale walls are strapped to the floor and to the top beam as tie-down.  This can be achieved a number of ways.  Many people are making strawbale walls with nylon strapping that can be ratcheted down.  We could not afford this option.  So we used fencing wire instead.  We made strips of wire with loops on both ends that were secured under the bottom boxing.

The bottom boxing was secured to the slab with dynabolts.  The boxing was secured to the posts with skew nails. 


The boxing was then filled with gravel and levelled:
Funky corner piece near the front door

The strawbales were then laid in a brickwork pattern where one bale overlaps two halves below.  As the strawbales are not perfect rectangles, the gentleman builder made a bale hammer.  We affectionately called it Stress Relief.

We have had a suggestion from a friend that stress relief should be hung ceremoniously above the front door!

Once the strawbales were laid, the top boxing was put in place so the strawbales could be compressed down.  A fencing wire strainer was then used to tighten the wire over a three day period.


We were battling a very wet year and built the wall in sections.  In each section, the bales were laid, straightened and then rendered on the outside.  We then hung a tarp up to offer further protection to the wall from rain.

North east corner baled


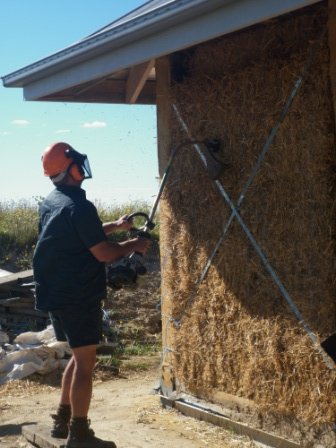
Low tech solution to loose ends of straw - whipper snipper to the rescue


In the sections where a straw bale did not fit, we either made small bales using a tool the gentleman builder forged.  It's essentially a large needle that you poke into the bale a the required length and feed baling twine into it and tie the twine off.  Alternatively, loose straw was packed into spaces that a bale would not fit.  Where loose straw was used, we stapled chicken mesh up to hold the straw in place.


Initially we made cob (straw, clay and water) to fill any gaps before rendering with the lime render (sand, lime putty and water).  The cob was pretty easy to make and apply but the clay content meant it swelled and shrank a lot and made the overlying render crack terribly.

Little Miss loved making cob

And the fact that we encouraged her to get her feet dirty
Cob filling a hole where two bales meet


Prior to rendering, all non-straw surfaces (wood and metal) were painted with a mixture of watered down PVA and sand.  This helps the render to stick to the surface.  Furthermore, the straw needs to be damp before applying render to ensure the render sticks.  Initially we used a pump action spray bottle to wet the straw.  We then purchased a whiz-bang pump action sprayer.  On the second coat of render outside, we resorted to a 10 litre plastic watering can.  The reasons for this are two-fold.  Firstly, the hand and pump action sprayers broke and cost a fortune.  Secondly, the watering can will apply a larger volume of water in about a tenth of the time.  We're still unsure what we are going to use when it comes to applying the third coat inside as, clearly, a watering can will make too much of  a mess indoors.
 
Lime is hard on skin and ridiculously painful if it gets into eyes so we wore protective gear when working with it.  Gloves and eye protection are a must. 

We apply the render with standard tools - rectangular and triangular trowels.

Spraying the wall prior to the application of render


North east corner rendered

Our rendering technique has vastly improved over the life of the build.  We ended up coming back to the first section of wall for a second attempt at a first coat.  As you can see on the right hand side of the photo below, our first attempt was pretty rough.


The gentleman builder initially made the render by hand in the wheelbarrow but it was seriously back breaking work and ended up purchasing a second-hand cement mixer.  It's some of the best money we spent on the build.


Padawan and Little Miss, despite all our best efforts at discouragement, would play on the sand pile.  In one of the first few loads of render, we had a fatality:

One of Little Miss' toy bugs was rendered into the wall and had to be pulled out.  It was subsequently washed and suffered no long lasting ill effects.

Tuesday, 21 February 2012

Straw, glorious straw

My brother-in-law grows grain to feed to stock.  We came to an agreement where he would arrange for the harvesters to cut the wheat straw when they harvested the grain, for a price.  I love that  we made use of a farming waste product in the construction of our home.  It took very little extra energy on behalf of the harvester to cut and bale the straw when threshing the grain.

I had some great photos of the harvesting but they were lost when our computer crashed.  So imagine a dry paddock with wheat and a big green harvester spitting out square bales of straw tied together with yellow bale twine.

On January 8 2011, the straw bales were delivered and stacked, literally, to the rafters.  Well, they are technically joists but you get the idea.

You can see, in the photo above, that we had the foresight to put the floorboards for the attic into the roof space before the roof was put on.  The floorboards are 5m long and were slid up into the roof space from the south end of the shouse prior to the colourbond going on.

The weather was still against us with La Nina giving us her best.  On January 12 at just before midday, it looked like this and was cold enough to warrant long sleeves and a jumper.: