Tuesday, 28 February 2012

Life is all about compromises

Unless you are a millionaire, and possibly even then, life is about compromises.  I had always wanted bay windows.  One of Mum and Dad's friends had glorious bay windows in their home which we used to hide in as kids and read in as teenagers.  I loved the feeling of being soaked in sunlight but being out of the wind and away from the flies.  Unfortunately, bay windows (as in the glassy component) are ludicrously expensive and well out of our league.  Thankfully, the strawbale walls are 500mm thick once they are rendered and provide an excellent opportunity for wide sills.

As we had milled our own timber for the beams, we had some offcuts and rejected pieces that we had deemed unsuitable for beams but would do just fine as sills.  The gentleman builder set about installing sills and reinforcing them to ensure they will hold enough weight to be used as window seats.  This meant that, again, we had to manoeuvre a very heavy piece of wood into an awkward spot.  The gentleman builder set up a couple of levers to lift the wood to the right height and I, as lacky, provided ballast on the ends of the levers while the gentleman builder put the central supporting pole under the window sill.

Brackets were used to attach the sill to the wooden posts at each end.  Strawbales were then trimmed to fit under the sill.

Once baled and rendered, the sills look pretty awesome.  The one in the bedroom faces north and is gloriously warm on a cold, stormy day.  I foresee that I will spend many spare hours reading in that spot!

Dining sill - facing east for beautiful morning sun

The shouse gets a doorstep (well, two)

With the wet weather, we were traipsing a lot of mud into the shouse.  We'd decided early on that we were going to have a stone stoop (well, we would love a stone stoop if we could afford such extravagances but had settled on tiles for the verandah and a stone step).  

While at Tony Williams to collect hydrated lime for the render, we had spied a pile of gorgeous pink granite (which is not pink but rather reddy-brown).   Each time we went there to top up on lime, we would scurry through the pile of pink granite to see if there was a suitable piece for the doorstep.  On one such day, we found not one but two pieces that we liked.  As the weather was wet and the quest had already taken over 6 months I declared that a two piece doorstep, while not ideal, would be fine.

The only problem was that each piece was about 350mm thick.  Firstly, that meant further excavation and I am still to recover from digging the footings.  Secondly, being granite, it meant that, once again, we'd be battling weighty beasts for a day in order to lay the doorstep.

While the guys at Tony Williams used the forklift to get the pieces into the trailer, we had to devise a method to get the rocks from the trailer, around the far side of the building and into their final resting place.

The gentleman builder and I had gained some muscle mass since the start of the build and together we managed to flip the  stones end on end and land them onto a loose straw bale to get them out of the trailer.  We then moved them, one at a time on rollers to the front door.

Then the digging began.   Again.  We wanted the doorstep hard up against the shouse wall and under the red gum board so it was mainly crowbar work to get the hole dug.  Thankfully, there was not a lot of space for two people to work so I generously let the gentleman builder do the majority of the digging.  We measured the hole to the nth degree to ensure that the rocks would fit as closely as possible on the first attempt.

Little Miss in the hole for the doorstep

We used the rollers again to get the first stone as close to the hole as possible and set up quite a precarious arrangement of strawbales, a left-over timber beam and the endless winch to be able to lower the stones into place.


Unfortunately, as we lowered the second stone into place the bolt that was holding the chain for the endless winch broke and flew off at great speed, clipping my thumb in the process.  Pain resulted, followed by swelling, throbbing and intense heat.  Out came the freezie block from the lunchbox Esky and, when, after ten minutes of ice the pain had not subsided (I had even agreed to taking Panadol);  the gentleman builder insisted on a quick trip to the Foster hospital emergency department.  Being a Sunday the radiologist was not on duty but, thankfully, the rostered GP had taken a few crash courses and was confident to take some films of my hand.  Thankfully the bone was not broken but was chipped and would need 4-6 weeks of rest to heal.  

We returned to the block about 2 hours later with my hand securely strapped and a supply of panadeine forte (which I had insisted I did not need but I actually succumbed to taking one to get to sleep that night).

Luckily, the gentleman builder is a talented and patient man as he managed to manoeuvre the final stone into place and backfill the hole without any assistance.  Admittedly, it took about 5 times as long as the first stone did but he got there in the end.


In the end we were very happy with the doorstep and the gentleman builder is convinced that in a thousand years all that will be left of the building will be two  pieces of pink granite submerged in the bedrock.


Sunday, 26 February 2012

Laying the strawbales


Water is cancer for strawbales.  In order to protect the straw from moisture, it is laid atop wooden boxing that is filled with gravel.  This ensures that, should moisture get into the walls, it can drain down through the straw and rest in the gravel away from the straw before draining outside.  Ideally, water would not get into the walls and that's our aim but, in the unlikely event of a washing machine or dishwasher-based emergency, it's important to be prepared.

Strawbale walls are strapped to the floor and to the top beam as tie-down.  This can be achieved a number of ways.  Many people are making strawbale walls with nylon strapping that can be ratcheted down.  We could not afford this option.  So we used fencing wire instead.  We made strips of wire with loops on both ends that were secured under the bottom boxing.

The bottom boxing was secured to the slab with dynabolts.  The boxing was secured to the posts with skew nails. 


The boxing was then filled with gravel and levelled:
Funky corner piece near the front door

The strawbales were then laid in a brickwork pattern where one bale overlaps two halves below.  As the strawbales are not perfect rectangles, the gentleman builder made a bale hammer.  We affectionately called it Stress Relief.

We have had a suggestion from a friend that stress relief should be hung ceremoniously above the front door!

Once the strawbales were laid, the top boxing was put in place so the strawbales could be compressed down.  A fencing wire strainer was then used to tighten the wire over a three day period.


We were battling a very wet year and built the wall in sections.  In each section, the bales were laid, straightened and then rendered on the outside.  We then hung a tarp up to offer further protection to the wall from rain.

North east corner baled


Low tech solution to loose ends of straw - whipper snipper to the rescue


In the sections where a straw bale did not fit, we either made small bales using a tool the gentleman builder forged.  It's essentially a large needle that you poke into the bale a the required length and feed baling twine into it and tie the twine off.  Alternatively, loose straw was packed into spaces that a bale would not fit.  Where loose straw was used, we stapled chicken mesh up to hold the straw in place.


Initially we made cob (straw, clay and water) to fill any gaps before rendering with the lime render (sand, lime putty and water).  The cob was pretty easy to make and apply but the clay content meant it swelled and shrank a lot and made the overlying render crack terribly.

Little Miss loved making cob

And the fact that we encouraged her to get her feet dirty
Cob filling a hole where two bales meet


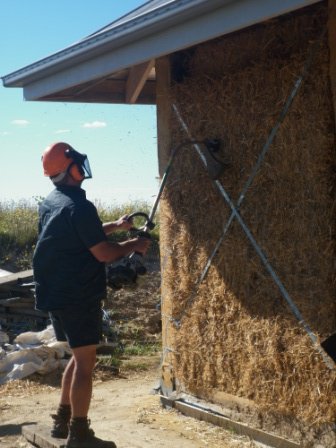
Prior to rendering, all non-straw surfaces (wood and metal) were painted with a mixture of watered down PVA and sand.  This helps the render to stick to the surface.  Furthermore, the straw needs to be damp before applying render to ensure the render sticks.  Initially we used a pump action spray bottle to wet the straw.  We then purchased a whiz-bang pump action sprayer.  On the second coat of render outside, we resorted to a 10 litre plastic watering can.  The reasons for this are two-fold.  Firstly, the hand and pump action sprayers broke and cost a fortune.  Secondly, the watering can will apply a larger volume of water in about a tenth of the time.  We're still unsure what we are going to use when it comes to applying the third coat inside as, clearly, a watering can will make too much of  a mess indoors.
 
Lime is hard on skin and ridiculously painful if it gets into eyes so we wore protective gear when working with it.  Gloves and eye protection are a must. 

We apply the render with standard tools - rectangular and triangular trowels.

Spraying the wall prior to the application of render


North east corner rendered

Our rendering technique has vastly improved over the life of the build.  We ended up coming back to the first section of wall for a second attempt at a first coat.  As you can see on the right hand side of the photo below, our first attempt was pretty rough.


The gentleman builder initially made the render by hand in the wheelbarrow but it was seriously back breaking work and ended up purchasing a second-hand cement mixer.  It's some of the best money we spent on the build.


Padawan and Little Miss, despite all our best efforts at discouragement, would play on the sand pile.  In one of the first few loads of render, we had a fatality:

One of Little Miss' toy bugs was rendered into the wall and had to be pulled out.  It was subsequently washed and suffered no long lasting ill effects.

Tuesday, 21 February 2012

Charcuterie

The gentleman builder is not only a builder, an artist and a bladesmith; he's also a food lover.  He adores fine food - organic spinach with homegrown eggs, 85% cocoa chocolate and fresh meat are high on his list of favourites.

The gentleman builder has great plans for the block in terms of a mixed farm business that will mean that we can get a bit of cash from selling cows, sheep, goats and pigs and, to a certain degree, pick the markets when they are high to sell our produce at a premium. We aim to obtain organic certification for the farm and have not used chemicals since we purchased the property in 2005.  We will have a mixture of poultry too - ducks and chooks are a given and we're still negotiating on geese (I'm happy to have geese as long as they are not kept too close to the house and they're honking and hissing is not at all appealing to me).  In fact, chooks will be first on our list of stock purchases when we move in to the block as the family eats a lot of eggs and there's nothing quite like fresh, organic eggs!

Anyway, back to the story at hand.  The gentleman builder is not a fussy eater (he married one, though) but has a real soft spot for good quality, fresh food.  I bought him a couple of books from the Book Depository at some point about preserving meats as he had spoken at length about his plans to butcher (or have butchered) a portion of our livestock once we're set up for such things so he can have a meat freezer stocked with delicious meaty treats.  Being a vegetarian, I cannot share his enthusiasm for this particular pursuit but I support him in eating quality food that is free from chemicals and, considering our children are also keen carnivores, I think it is a great idea to take advantage of the beautiful meat we will grow.  Organic, grass fed produce is pretty difficult to find and has many health benefits over produce grown on grain.

The gentleman builder sourced some natural casings, purchased some meat and dug out the mincer my Mum had handed down to me.  He then set about making his own sausages.  

Meat


Sausages


Through the process Padawan and Little Miss learnt the value of sausages.  The whole process took over an hour and the sausages lasted about a week, rationed out.  The kids beg the gentleman builder to make sausages on a fairly regular occurrence and whine incessantly when the response is "when we are living at the block we will have more time for things like that again".


Straw, glorious straw

My brother-in-law grows grain to feed to stock.  We came to an agreement where he would arrange for the harvesters to cut the wheat straw when they harvested the grain, for a price.  I love that  we made use of a farming waste product in the construction of our home.  It took very little extra energy on behalf of the harvester to cut and bale the straw when threshing the grain.

I had some great photos of the harvesting but they were lost when our computer crashed.  So imagine a dry paddock with wheat and a big green harvester spitting out square bales of straw tied together with yellow bale twine.

On January 8 2011, the straw bales were delivered and stacked, literally, to the rafters.  Well, they are technically joists but you get the idea.

You can see, in the photo above, that we had the foresight to put the floorboards for the attic into the roof space before the roof was put on.  The floorboards are 5m long and were slid up into the roof space from the south end of the shouse prior to the colourbond going on.

The weather was still against us with La Nina giving us her best.  On January 12 at just before midday, it looked like this and was cold enough to warrant long sleeves and a jumper.:


Monday, 20 February 2012

The ultimate in sustainable living

I have been heartened today.  One of the few ladies I truly admire and respect, Miranda Kerr, has again come out in support of breastfeeding.  In her blog, Miranda talks frankly about the latest hurdle breastfeeding mums are facing, that of breastfeeding in public.  Having breastfed for nearly 9 years of my life, I can admit to breastfeeding my children in pretty much every place you can imagine - the shopping centre, parked car (picture any place you've seen a car parked and that would have been me), park benches, my bed, the lounge room floor, the swing, atop of a hay bale, on the side of the road, you get the idea.

I received many negative comments along the way.  Initially I took the unlightened and insensitive comments personally and found myself questioning my choices.  Over time and through my involvement as a breastfeeding counsellor with the Australian Breastfeeding Association, I took these encounters as an opportunity to educate people about breastfeeding.  Whenever I received a negative comment about nourishing my child with the best food it will ever receive, I would pick a fact about breastmilk or breastfeeding and state it clearly and plainly.  

For example, when a man in his early 80s once commented on me breastfeeding my then 5 year old son after he had a nasty fall on the street I very calmly responded that the act of breastfeeding releases oxytocin (the "love hormone") in both mother and child and helps to soothe a child after a fright or injury.  When a woman in her late teens snickered at me breastfeeding my baby while pushing the trolley, I turned around and calmly told her that my child was hungry and that she needed a feed and did not have the ability (at 5 weeks) to wait until my grocery shopping was done.  She stopped and we chatted for a few minutes about breastfeeding and both walked away happy.

It took me a long time to master this response but it was well worth it.  

Breastfeeding is the ultimate in sustainability.  There are no bottles, no teats, no sterilising, no washing, no tins, no waste.  Breastmilk is available when needed in whatever amount is required.  It is at the perfect temperature and is, as my husband keeps telling me, served from a much more attractive vessel.  The breastfed child receives the perfect blend of water, long chain fatty acids, immunoglobunlins, protein and carbohydrates. Breastmilk is easily digestible.  Breastfeeding reduces the risks of SIDS, asthma, diabetes, lukemia, breast cancer (in both mother and child), eczema and obesity.   Furthermore, breastfeeding increases intelligence, boosts bonding between mother and child and reduces the production of cortisol (a stress hormone).

Breastmilk changes in composition over time.  Colostrum, the milk produced prior to and for the first three to four days after birth, is rich and high in protein which helps clear the bowels of meconium.  Should a breastfed child get ill, the mother will produce antibodies to help the child fight off the infection.  In hot weather, breastmilk has a higher water content to quench thirst.  As a child weans naturally, breastmilk reverts to consistency similar to colostrum.  A final gift from nature!

The construction gets a name

While we named 'The Block' early on; the name for the building we were working on took longer to evolve.  All the hours that we dug we'd chat to the kids about the name for our "block".  We initially referred to the building as the shed, but over time we decided that it deserved more than that.  One day, while working my hubby came up with the shouse.  It was a merge of shed and house but had an equally appropriate meaning on the days when things weren't going according to plan.

Shouse has stuck as the name for what will be our new home.  I like that it respects the origin of the construction and shows how the project has evolved over time.

To me, it is a reminder that life is unpredictable and that, how when things don't go according to your original plan they can still be pretty awesome!

Sunday, 19 February 2012

Waiting, waiting, waiting

While waiting for the grain to mature so the straw could be harvested, we put in place the frame for the door and the windows.  All the windows and the door are second hand.  All are solid timber.  All required (or still require) a lot of work to bring them up to scratch but we felt strongly about not buying new what we could get secondhand.  The money we saved ourselves was an added bonus.

Bedroom window and bathroom window in place

You might be able to see, in the photo above, that we had painted the external brackets with zinc rust proofing paint.

Door frame in place
In the photo above, you can see that we had some leftover hardwood spaced out on the floor.  This was to keep the straw off the floor in case moisture got in.  Moisture is cancer for strawbales.

Not being a patient person, I was chomping at the bit and hanging to get started on constructing the walls.

We made the right choice

While the gentleman builder worked on the roof, I took my hand to cleaning up the internal posts with an angle grinder and flap wheels.


We rushed like mad to get the internal ply wall up before the frame inspection.  As our luck would have it, it was a horrendous day.  Rain was coming in sideways and it was freezing - perfect December weather.

Padawan and Little Miss helped with great enthusiasm to paint the structural wall with linseed oil to protect it, somewhat, from the rain until the roof was up.

Hoodie and long sleeves in the middle of summer - welcome La Nina

We had a couple of issues trying to get our building inspector to do the frame inspection, required before the roofing material is installed.  We got there in the end and just before Christmas 2010, we had the team from MBM services come to put up our Colorbond roof. 

Ridge capping going on
I wanted some velux roof windows to let natural light into the attic and allow for ventilation of the shouse during summer.  We decided that two on the east wall would be best as we have a small kitchen window on the west wall and opening the kitchen window and the roof windows would allow for natural ventilation of the shouse, taking advantage of the sea breeze in the afternoon.  The budget being what it was, however, we had to compromise and purchased some perspex relicas.  While they are not exactly what I initially wanted, they do a great job at letting light into the attic and work just as planned to cool the upstairs space.


I am really very happy with the roof.  I love the colour and the pitch of the roof means that, even when I stand downhill of the shouse I get to admire it.